Skip to content



Serving an ultra-smooth, cloud-like dip made from rich French dairy is one of the quickest ways to elevate a party appetizer platter. Learning how to make whipped brie cheese transforms a standard cheese wheel into a light, spreadable, and airy cream that pairs effortlessly with warm crostini, fresh fruit, or artisanal crackers. By removing the outer rind and whipping the softened core in a food processor, you create a luxurious dip with minimal effort.
Short Summary
Rind Removal: Trimming away the white outer rind ensures a silky, lump-free texture.
Temperature Tempering: Bringing the cheese to room temperature prevents emulsion separation and greasiness.
High-Speed Aeration: Whipping in a food processor incorporates air for a fluffy, cloud-like consistency.
Emulsifying Moisture: Adding a teaspoon of warm water or olive oil smooths out stiff dairy fats.
Garnish Versatility: Pairs naturally with warm honey, toasted pistachios, or fresh rosemary sprigs.
For practical guidance on keeping Brie cheese fresh and properly refrigerated, check out How to Store Brie Cheese for detailed storage recommendations.
How to Make Whipped Brie Cheese
Creating a light, airy whipped brie involves removing the outer bloomy rind and aerating the soft center until smooth. In simple terms, a chilled wheel of brie is trimmed to expose the creamy interior, cut into small cubes, and allowed to warm to room temperature. Processing the softened cubes at high speed incorporates air, creating a velvety dip ready for sweet or savory toppings.
According to the FDA, perishable dairy products should be refrigerated at 40°F (4°C) or below, and proper refrigeration helps slow the growth of harmful bacteria.
For practical guidance on the refrigerated shelf life and proper storage of Brie cheese, check out How Long Does Brie Cheese Last for a detailed guide.
Selecting Tools for Whipping Brie
Using the right kitchen equipment makes all the difference when transforming a firm dairy core into a velvety spread. High-powered blades break down fat molecules quickly without generating excess friction heat.
Food Processor: The best choice for aeration; fitted with a sharp S-blade to process curds evenly.
High-Powered Stand Mixer: Works well using a paddle attachment if the cheese is fully softened.
Flexible Silicone Spatula: Essential for scraping down the sides of the bowl to eliminate unmixed lumps.
Chef’s Knife: A sharp knife allows you to trim away the thin outer rind with minimal waste.
If you are interested in making your own traditional cheese wheel from scratch before whipping, read our complete guide on how to make brie cheese at home.
Ingredients for a Smooth Whipped Blend
Creating an airy dip requires simple ingredients and precise liquid adjustments:
| Ingredient | Quantity | Primary Function |
| Brie Cheese Wheel | 1 Wheel (8 to 12 oz, cold for trimming) | Serves as the rich, creamy base |
| Warm Water or Olive Oil | 1 to 2 teaspoons | Smooths out stiff fats during processing |
| Flaky Sea Salt | 1 Pinch (Optional) | Enhances natural buttery flavor notes |
| Warm Honey or Hot Honey | 2 tablespoons (For serving) | Adds a sweet contrast over the whipped dip |
| Toasted Pistachios or Pecans | 2 tablespoons (For serving) | Provides a crunchy textural contrast |
According to the USDA, perishable foods should be kept refrigerated at 40°F (4°C) or below, and food should be covered or wrapped to help maintain quality and protect it from contamination.
For home cooks curious about alternative soft dairy bases, check our tutorial on how to make cream cheese at home.
The Step-by-Step Whipping Process
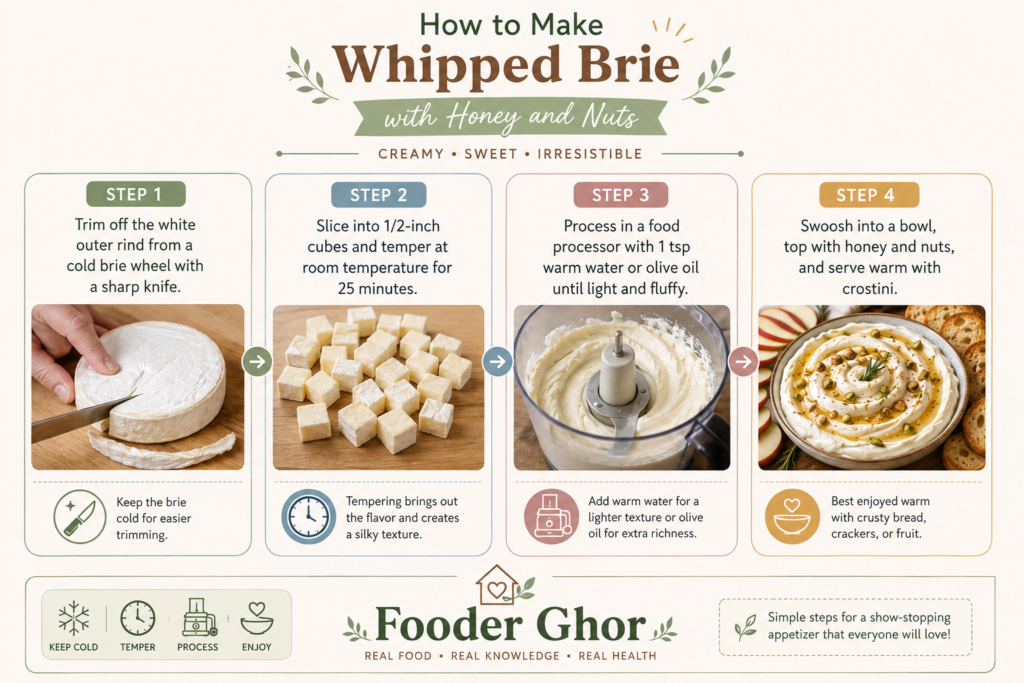
Following each step systematically prevents fat separation and ensures an ultra-fluffy finish every time.
Step 1: Rind Removal Strategy
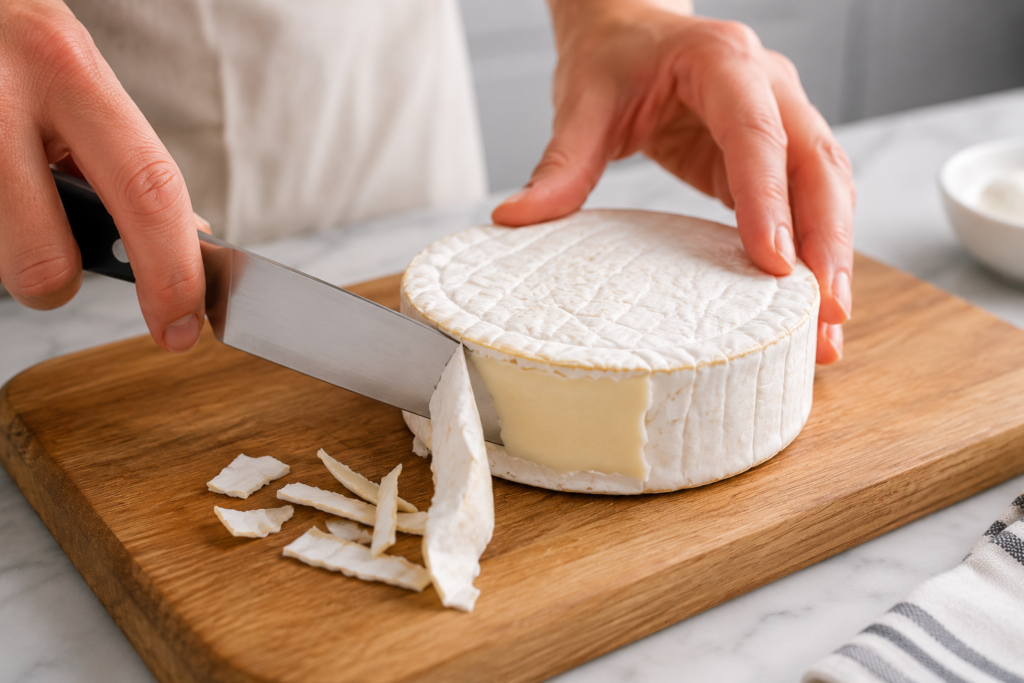
Trimming the rind is crucial because processing the white outer skin leaves grainy bits in your dip. Start with a cold wheel straight from the refrigerator so the cheese remains firm while cutting.
Using a sharp knife, slice off the top and bottom rind faces, then slice around the circular edge to remove the rind entirely. Aim to remove only the thin white layer to preserve as much creamy interior as possible.
If you enjoy baking wrapped cheeses whole, check our popular recipe on how to make brie cheese with jam.
Step 2: Cubing and Tempering the Cheese
Slice the trimmed cheese paste into small 1/2-inch cubes. Smaller pieces allow the food processor blades to catch and whip the dairy evenly without overworking the motor.
Place the cut cubes into a bowl and let them sit at room temperature for 20 to 30 minutes. Tempering is essential; cold fat resists aeration and can break into oily, grainy clumps when blended cold.
For alternative soft curd preparations, explore our recipe on how to make cottage cheese.
Step 3: Blending Until Fluffy and Light
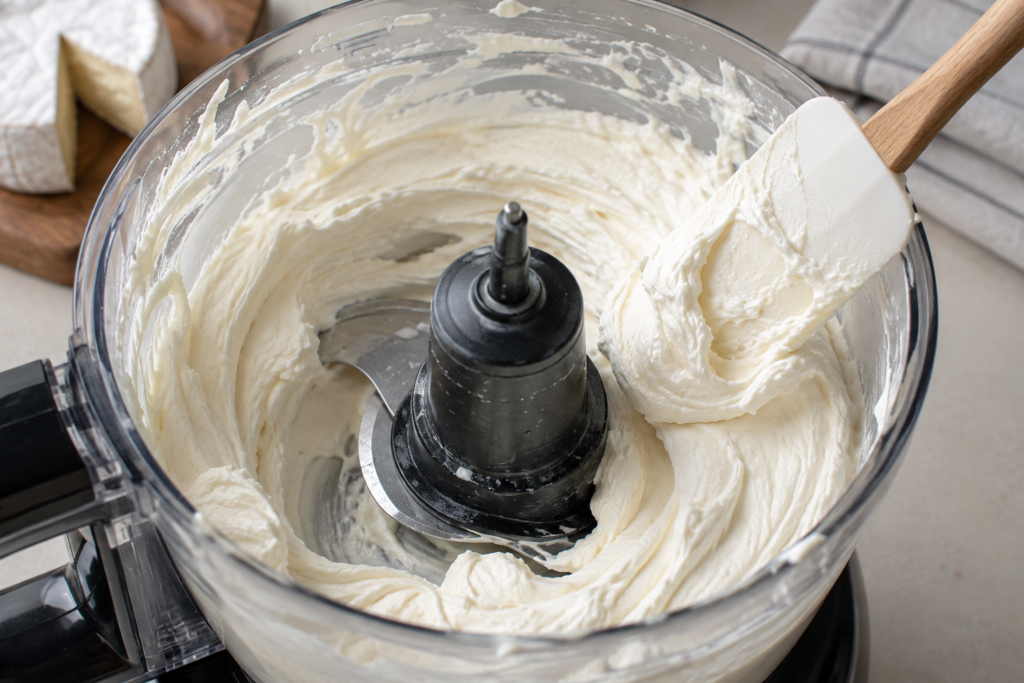
Transfer the room-temperature cheese cubes into your food processor bowl fitted with an S-blade. Pulse 5 to 6 times to break down the cubes, then run on high speed for 1 minute.
Stop and use a flexible spatula to scrape down the sides of the bowl. Add 1 teaspoon of warm water or high-quality extra virgin olive oil, then blend on high speed for another 2 to 3 minutes until the mixture turns pale, glossy, and fluffy.
For practical guidance on the shelf life and storage of goat cheese, check out How Long Does Goat Cheese Last for a detailed guide.
Serving and Garnishing Variations
Sweet Honey & Nut Garnish: Spread the whipped dip into a wide bowl, create shallow swooshes with a spoon, and drizzle warm honey over toasted chopped pistachios.
Garlic & Herb Blend: Fold in finely minced fresh rosemary, thyme, and roasted garlic before processing for a savory dip.
Spicy Berry Twist: Top with warm chili-infused jam or raspberry preserves alongside toasted crostini.
Serving Pairings: Serve alongside green apple slices, pita chips, water crackers, or warm crusty baguette slices.
For pantry-friendly alternatives using dry milk bases, read our guide on how to make cottage cheese from powdered milk.
Why Trust Fooder Ghor?
At Fooder Ghor, we provide educational resources focused on understanding the safe use, handling, and storage of different types of milk, including breast milk, cow’s milk, goat milk, and raw milk, based on publicly available guidance from trusted sources such as the CDC, FDA, USDA, and AAP. Some milk-related articles, particularly those involving maternal and infant feeding topics, are reviewed for clarity and presentation by nursing students with academic training in maternal and child health to help make information easier to understand. This content is provided for learning purposes only and does not offer medical advice.
Frequently Asked Questions
No, you should always remove the white bloomy rind before whipping. Blending the rind into the cheese results in small, firm flecks rather than a smooth, velvety consistency.
Adding 1 to 2 teaspoons of warm water, heavy cream, or extra virgin olive oil during processing helps emulsify the fat molecules, yielding an extra light and airy finish.
Separation occurs when cold cheese is overworked in the processor or when friction heat melts the fat. Always temper your cheese to room temperature before processing, and blend in short bursts.
A food processor with an S-blade works best, but a stand mixer with a paddle attachment or a hand mixer can work if the cheese is fully softened at room temperature.
Conclusion
Learning how to make whipped brie cheese provides a quick, versatile appetizer option for entertaining family and friends. By carefully trimming the white rind, tempering the cheese to room temperature, and blending until fluffy, you transform a simple dairy wheel into a luxurious spread. Plate it in a shallow bowl, top with honey and toasted nuts, and serve alongside your favorite crackers.
To learn about crafting unpasteurized artisan cheeses from scratch, explore our step-by-step guide on how to make brie cheese from raw milk.